
Lemon squares represent one of baking’s most elegant and enduring classics, a dessert that transcends generations and culinary trends with remarkable grace. Like discovering a perfectly tailored vintage piece that never goes out of style, the old fashioned lemon squares recipe embodies timeless appeal—combining buttery shortbread foundations with bright, zesty custard layers that sing with citrus sophistication. This comprehensive baker’s guide explores the artistry behind crafting these iconic treats, from ingredient selection to presentation techniques that elevate them from simple dessert to showstopping centerpiece.
The beauty of traditional lemon squares lies in their elegant simplicity and the precision required to achieve perfection. Much like curating a personal style that reflects individual taste, mastering this recipe means understanding fundamental techniques and knowing when to honor tradition versus when to add personal flourishes. Whether you’re baking for afternoon tea, garden parties, or intimate gatherings, understanding the nuances of this beloved dessert transforms your baking repertoire.

Understanding Classic Lemon Squares Fundamentals
The architecture of authentic lemon squares follows a proven formula that has delighted bakers for decades. The foundation consists of a tender, buttery shortbread crust that provides structural integrity and rich contrast to the bright filling above. This base layer, typically baked partially before adding the custard, creates textural complexity that distinguishes exceptional lemon squares from mediocre versions.
The filling represents the true star—a silky, custard-like mixture infused with fresh lemon juice and zest that delivers both visual appeal and bold flavor. The chemistry involved in creating the perfect consistency requires understanding how eggs, sugar, and acid interact during baking. The top should set to a delicate firmness while maintaining a subtle wobble at the center, ensuring moistness without greasiness.
Understanding why each component matters helps you appreciate the different types of baking approaches available. Traditional recipes prioritize simplicity and ingredient quality, allowing natural flavors to shine without unnecessary additions or modifications.
Essential Ingredients and Quality Selection
Creating exceptional lemon squares begins with ingredient sourcing. Unlike trendy recipes that chase novelty, classic preparations rely on fundamental components executed with precision:
- Unsalted butter: The foundation of both crust and filling requires high-quality, fresh butter with rich flavor. Choose European-style butter when possible for superior fat content and taste.
- All-purpose flour: Provides structure for the shortbread base. Measure by weight for consistency, or use the spoon-and-level method rather than scooping directly from the bag.
- Fresh lemons: Nothing substitutes for freshly squeezed juice and zest. Select firm, unblemished lemons with thin skins, indicating maximum juice content. Meyer lemons offer subtle sweetness, while Eureka lemons provide sharp brightness.
- Eggs: Room temperature eggs incorporate smoothly into the custard filling, creating a silky texture. Use large eggs for consistent results.
- Granulated sugar: Fine granulation dissolves completely into the filling, creating a smooth consistency. Avoid confectioners’ sugar, which contains cornstarch and alters texture.
- Powdered sugar: Reserved exclusively for dusting the finished squares, providing elegant presentation and subtle sweetness.
Quality matters tremendously in recipes with minimal ingredients. Each component’s flavor profile directly influences the final result, making ingredient selection as important as technique itself.
Step-by-Step Preparation Guide
Successful lemon squares require organized preparation and attention to timing. Begin by preheating your oven to 350°F (175°C), allowing adequate time for proper temperature calibration. Inaccurate oven temperatures represent the most common cause of disappointing results, so consider using an oven thermometer for verification.
Line a 9-inch square baking pan with parchment paper, extending the paper beyond the pan edges for easy removal. This simple step prevents frustrating cleanup and ensures clean cuts when serving. Some bakers prefer buttering the pan beneath the parchment for additional security.
Gather all ingredients and equipment before beginning—a practice known as mise en place. Measuring ingredients in advance prevents mid-process scrambling and ensures accuracy. Zest your lemons before juicing them, as juice makes zesting difficult. You’ll need approximately 2-3 tablespoons of zest and ¼ cup of fresh juice for traditional recipes.
Perfecting the Shortbread Base Layer
The crust represents the foundation upon which success is built. Combine 2 cups all-purpose flour, ½ cup granulated sugar, and ¼ teaspoon salt in a mixing bowl. The salt enhances butter flavor while balancing sweetness—a principle similar to how fashion sense develops through understanding balance and proportion.
Cut 1 cup (2 sticks) cold, cubed unsalted butter into the flour mixture using a pastry cutter, two knives, or your fingertips. Work quickly to maintain butter’s cold temperature, creating pea-sized pieces throughout the mixture. This texture creates the desired flaky crust. The mixture should resemble coarse breadcrumbs when properly combined.
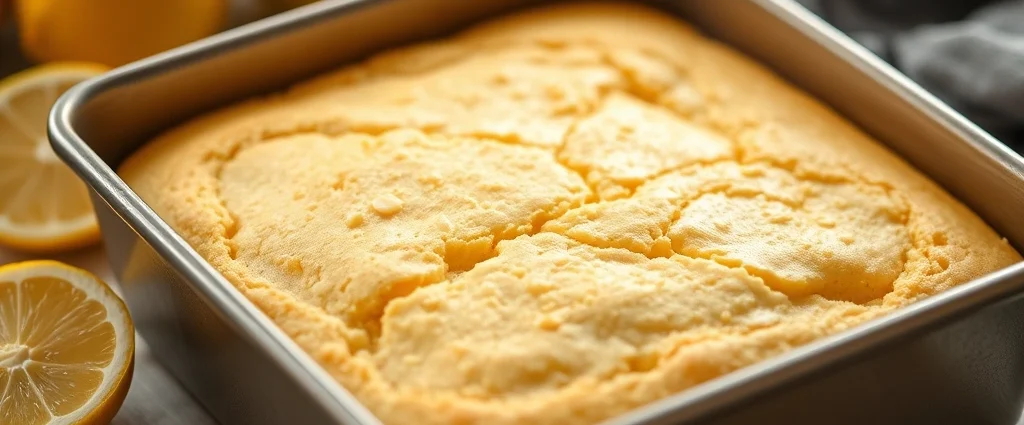
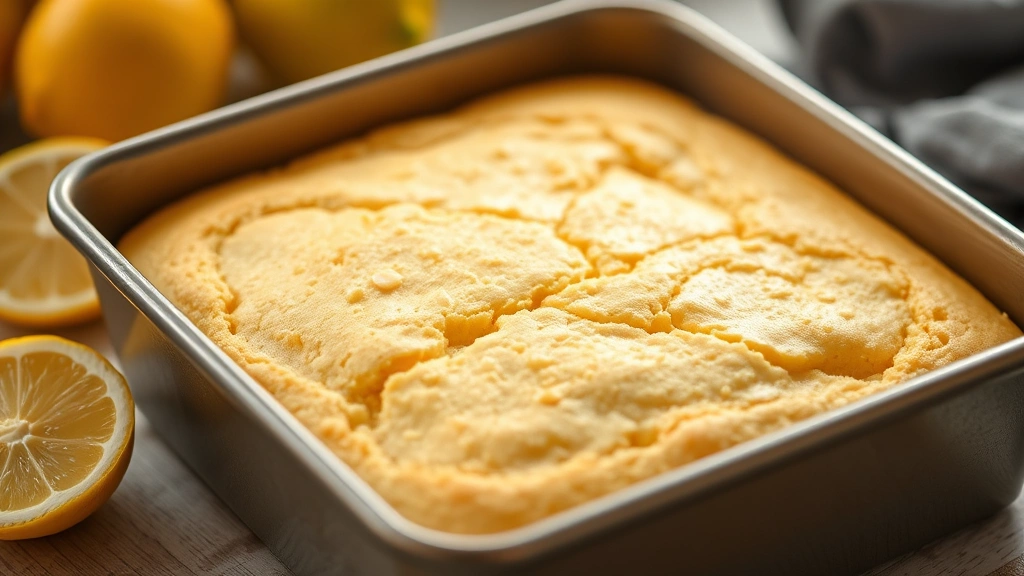
Press the mixture firmly into your prepared pan, ensuring even distribution across the bottom and slightly up the sides. A measuring cup or the bottom of a glass helps achieve consistent pressure. Bake this crust alone for 12-15 minutes, until very lightly golden at the edges. This pre-baking step, called blind baking, prevents the finished crust from becoming soggy.
Remove the crust from the oven and allow it to cool slightly while preparing the filling. The residual heat from the pan will continue cooking the base layer, so slight underbaking at this stage prevents over-browning.
Creating the Signature Lemon Custard Filling
While the crust bakes, prepare the filling that defines these iconic squares. Whisk 4 large eggs with 2 cups granulated sugar until the mixture becomes pale and slightly thickened, approximately 3-4 minutes of vigorous whisking. This incorporation of air creates a lighter custard with better texture.
Add 3 tablespoons all-purpose flour and ½ teaspoon baking powder to the egg mixture, whisking until just combined. These ingredients provide subtle structure without creating a dense, cake-like filling. Avoid over-mixing, which develops gluten and toughens the final product.
Stir in your fresh lemon juice and zest, combining thoroughly but gently. The acid from the lemon juice begins breaking down the egg proteins, creating the characteristic silky custard texture. Some recipes incorporate a tablespoon of cornstarch for additional thickening; this adjustment suits those preferring firmer squares.
Pour the filling over your partially baked crust immediately after mixing. The warm crust helps the filling set properly during baking, while the brief cooling prevents the eggs from scrambling upon contact with excessive heat.
Baking Techniques and Temperature Control
Bake the assembled lemon squares at 350°F for 20-25 minutes. The filling should appear set at the edges while maintaining a slight jiggle at the very center—this indicates perfect doneness. Over-baking creates a rubbery, dense filling, while under-baking results in runny centers that don’t firm up properly during cooling.
Oven positioning matters more than many bakers realize. Bake in the center rack position for even heat distribution. If your oven runs hot, consider placing a baking sheet on the rack below to prevent over-browning on the bottom. This technique mirrors how different types of fashion require different approaches—adaptation based on individual circumstances ensures optimal results.
A reliable oven thermometer helps identify temperature discrepancies. Many home ovens vary significantly from their displayed temperature, causing frustrating inconsistencies. Investing in this simple tool transforms baking reliability dramatically.
Cooling, Cutting, and Finishing Touches
Remove your lemon squares from the oven and allow them to cool in the pan for at least 30 minutes before refrigerating. This cooling period allows the filling to set sufficiently for clean cutting. Complete cooling typically requires 2-3 hours, though refrigerating overnight produces the cleanest cuts.
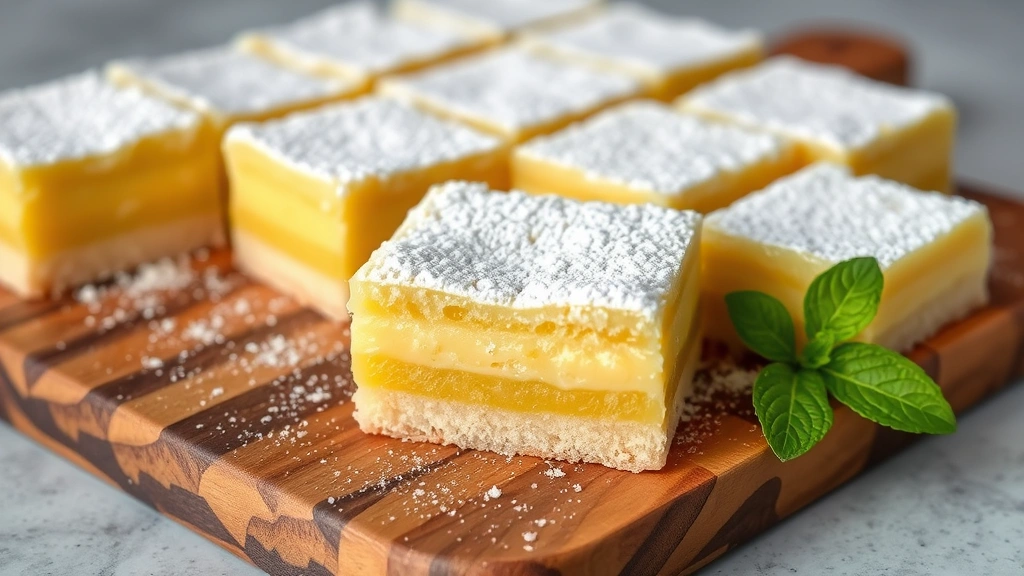
Using the parchment paper edges, lift the entire sheet from the pan and transfer it to a cutting board. A sharp knife dipped in hot water and wiped dry between cuts prevents sticking and creates clean, professional-looking squares. Cut into 16 pieces (4×4 grid) for standard serving sizes, or adjust dimensions based on preference.
The final flourish involves dusting each square generously with powdered sugar. This classic presentation provides visual elegance and adds subtle sweetness. Some bakers prefer a light dusting, while others apply generous coatings—adjust to personal taste. Consider using a fine-mesh sieve for even distribution that resembles fresh snow.
For special occasions, additional garnishes elevate presentation further. Candied lemon slices, fresh mint sprigs, or edible flowers create Instagram-worthy displays. These embellishments transform simple squares into sophisticated desserts worthy of upscale tea services.
Storage and Make-Ahead Strategies
Properly stored lemon squares maintain quality for up to five days in an airtight container at room temperature. The filling’s moisture content keeps them from drying out, making them ideal for advance preparation. Some bakers claim the flavor improves after a day, as the filling continues setting and flavors meld.
For extended storage, freeze un-dusted squares in single layers on a baking sheet before transferring to freezer bags. Properly frozen lemon squares remain excellent for up to three months. Thaw at room temperature for 1-2 hours before serving, then dust with powdered sugar immediately before presentation.
The make-ahead advantage positions lemon squares perfectly for busy schedules. Prepare the crust and filling components separately days in advance, then assemble and bake as needed. This flexibility mirrors the practical wisdom found in style blogs about planning outfits efficiently—preparation enables effortless execution when moments matter most.
For those seeking to explore variations while maintaining classic appeal, consider experimenting with different citrus varieties. Blood orange lemon squares offer dramatic color and subtle complexity, while key lime versions provide tropical brightness. These adaptations honor tradition while expressing individual creativity.
Frequently Asked Questions
Why is my lemon square filling runny after baking?
Runny filling typically results from under-baking or oven temperature inaccuracy. The center should jiggle slightly but not slosh when the pan moves. If your oven runs cool, increase temperature by 25°F or extend baking time by 3-5 minutes. Ensure proper cooling time—at least 30 minutes in the pan—before judging final consistency.
Can I make lemon squares without fresh lemons?
While fresh lemon juice provides superior flavor and brightness, bottled juice works in emergencies. However, the flavor profile becomes noticeably flatter and less vibrant. Never substitute lemon extract for juice; it creates an artificial, overpowering taste that undermines the recipe’s elegance. Fresh lemons represent a non-negotiable ingredient for authentic results.
How do I achieve perfectly clean cuts?
Refrigerate or freeze the squares before cutting for the cleanest results. Use a sharp knife heated under hot water and wiped dry between each cut. Some bakers apply a thin oil coating to the knife blade to prevent sticking. Cut using gentle sawing motions rather than pressing down forcefully, which causes crumbling.
What’s the difference between lemon bars and lemon squares?
These terms refer to the same dessert—lemon bars and lemon squares are used interchangeably in American baking. The terminology varies by region and personal preference. Both describe the same classic layered dessert with shortbread base and lemon custard filling.
Can I double the recipe?
Yes, lemon squares double easily using a 9×13-inch baking pan. Double all ingredient quantities and bake at the same temperature for approximately 30-35 minutes, as the larger pan distributes heat differently. Monitor carefully, as the extended baking time requires attention to prevent over-browning.
Why does my crust become soggy?
Soggy crusts result from insufficient pre-baking or excessive filling moisture. Blind bake the crust for 12-15 minutes until it begins setting. Ensure fresh lemon juice and avoid excess moisture in the filling. Some recipes include cornstarch or additional flour to absorb excess liquid—experiment to find your preferred consistency.
External Resources: For additional baking inspiration, explore Vogue’s food and entertaining section for sophisticated entertaining ideas. Bon Appétit magazine offers professional baking techniques and recipe refinements from renowned pastry chefs. The Kitchn provides trusted home baking guidance and troubleshooting advice. King Arthur Baking Company delivers professional-grade baking science and ingredient recommendations. Finally, MasterClass offerings from renowned chefs provide advanced culinary techniques applicable to elevated home baking.